
In this post, learn the NAV Programming Language C/AL even though you don’t have any experience with it.
Table of Contents
Getting Started with NAV Programming Language
NAV (short for “Navision“) is a business management software suite that includes an integrated development environment (IDE) for creating custom applications. The NAV programming language is used to develop these applications, which can be used to automate business processes, manage data, and provide custom functionality.
To get started with NAV programming language, you’ll need access to a NAV installation and the NAV IDE. If you don’t already have these, you can download a trial version from the Microsoft website.
What is C/AL?
C/AL(Client Application Language) is the programming language using in the C/SIDE(Client/Server Integrated Development Environment) in the Microsoft Dynamics NAV previously Navision.
By the help of this language we have following type of uses in Microsoft Dynamics NAV environment.
- Form objects and Report objects are handling the data presentation
- Data storage and organization is handled with help of table objects and built in Database Management System(DBMS)
- Data acquisition is handled with the help of Form and Dataport Objects
How to view the C/AL Codes?
You can view the view the C/AL codes from the Object Designer option in the Microsoft Dynamics NAV.
To open Object Designer you have to follow below steps:
- Go to the menu part of the Navision client.
- Then go to the Tools -> Object Designer other wise press the short cut key Shift + F12 from your key board.
- There you can view following elements Table, Form, Page, Report, Dataport, XML Port, Code Unit etc. All these having C/AL codes expect Page. First up all we will see how to view C/AL for a code unit.
- To open a C/AL code for a Code Unit you have to click Code Unit Button then select the code unit number 5804 – ItemCostManagement. Then press OK
- Click Design Button in the lower side to view the code.
Self Practice Topic 1
For opening the C/AL codes in different areas
- How to open the C/AL code of Form No. 26 (Vendor Card)?
- How to open the C/AL Code of Report No.3 (G/L Register)?
- How to open the C/AL Code of XMLport 8002 (Item)?
Answer:
1) To do this you have to first open the object designer from the Tools->Object Designer or Press Shift+F12.
As a next step click on the Form option then select the form no 26.
Further to that click on the Design button.
Then press F9 to view the codes of the Vendor card.
2) To do this you have to first open the object designer from the Tools->Object Designer or Press Shift+F12.
Then click on the Report option then select the Report no 3.
Then click on the Design button.
Then press F9 to view the codes of the G/L Register.
3) To do this you have to first open the object designer from the Tools->Object Designer or Press Shift+F12.
Then click on the XMLport option then select the XMLport 8002.
Then click on the Design button.
Then press F9 to view the codes of the Item.
How C/AL Editor Look Like?
The C/AL Editor looks like following picture. Each C/AL editors are different divisions. These details are explained as follows.

Each gray bar is called as Triggers and C/AL code that you may see listed below the gray bar is the “Trigger Code” for that trigger. Not that some triggers not having any codes thse are called as empty triggers.
In the C/AL Editor mainly 3 types of Triggers available
- Documentation Trigger
- Event Trigger
- Function Trigger
Documentation Trigger
Documentation triggers is not really a trigger, it will not run any codes. Normally this place is used for the documantation purpose only. ie, to specify the modifications to the standard objects.
Event Trigger
Event Trigger is trigger used to handle the triggers in the system. All the Event triggers are start with “On”. The “OnRun” event trigger is an essential component of NAV programming language, as it is executed every time the program is run. To put it differently, whenever the program is executed, the “OnRun” event trigger is triggered.
Function Trigger
Object triggers are an integral part of NAV programming language, and they are executed in response to a specific event or action. In this case, the triggers are executed whenever a function is called in an object. This means that whenever a function is invoked, the corresponding trigger is automatically executed, allowing you to perform certain actions or operations based on the event that triggered it.
DATA Types
Data Types are different kinds of information that may appear in the C/SIDE Environment.
Different data types having different values and each of them having different way of representation.
Example:
If we have two data types “12” and “36” and add them, we will get different values according to different data types. ie, If they are numbers then the result would be 48 and on the other hand if we consider these are text then the result would be “1236” only.
Data Types can be mainly divided in to 4 types
- Simple Datatypes
- Numeric Data Types
- String Data Types
- Boolean, Date and Time
- Simple Datatypes: Simple data types are those types of data which have only one value and which cannot be broken up into other values of different types.
- Numeric Data Types: Numeric Data Types are all forms of numbers or amounts.
| TYPE | RANGE | SIZE | EXAMPLE | DEFAULT VALUE |
|---|---|---|---|---|
| Integer | From 2,147,483,647 to + 2,147,483,647 | 4 Bytes | 121000-1000 | 0 |
| Decimal | From -1X10^63(1 followed by 63 zeros) to + 2,147,483,647 | 12 Bytes | 12.50-2.00.008 | 0 |
| Option | Red, Orange, yelow, Green, Blue, Indigo, Violet Where 0 is Red and 3 is Green | 0 | ||
| Char | 0-255 | 1 Bytes | ‘b’ ‘C’ ‘3’ ‘?’ |
- String Data Types:
| TYPE | RANGE | SIZE | EXAMPLE |
|---|---|---|---|
| Text | From 0 to + 250 | add one to the length and round up to the nearest four. Thus and 8 char text takes up to 12 bytes (1+8 round up to the nearest 4) | “Hello”‘127.50’ |
| Code All Letters are forced to upper case and all leading and trailing spaces are removed. | add 2 to the length and round up to the nearest 4. Thus an 11 character code takes up 16 bytes (2+11 round up to the nearest 4) | ‘HELLO”127.50’ |
- Boolean, Date and Time
| TYPE | RANGE | SIZE | EXAMPLE |
|---|---|---|---|
| Boolean | 1 Byte in memory only | TRUEFALSE | |
| Date | 1/1/0000 through 12/31/9999 | 4 Bytes | 0D (The undefined date, less than all other dates)123197D (Dec 31 1997) |
| Time | 00:00:00 through 23:59:59:999 | 4 Bytes | 1030000T (10:30am)0T(The undefined time, less than all other times) |
MESSAGE Function
MESSAGE Function is simplest function in the Microsoft Dynamics NAV. By the help of these function we can able to display a message box at the time of running an Object. This is commonly used to display Warning Message, testing message etc.
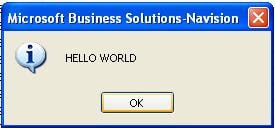
First up all i will tell how to display a “HELLO WORLD” text in the Message Box. For that first we have open a C/AL editor,
for how to open C/AL editor click on the C/AL Editor.
Then you have to type the following code in the C/AL editor
MESSAGE(‘HELLO WORLD’);
After entering this you have to save the code and Run the code. Then you will get a window like the following picture.
Exercises
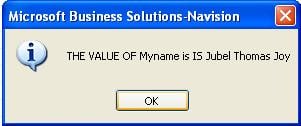
To display your name in the message box type the following code
MESSAGE(‘THE VALUE OF %1 IS %2′,’Myname is’,’Jubel Thomas Joy’);
If you type the message like this then you will get the display like
Variables
A Variable is a reference to the data value that can vary while user is running the application.
Variable always check actual memory location in which data is stored. Every variable has a datatype which describes the type of data that can be stored and each of them having value, this is stored actually in the memory address.
Mainly 3 types of variables are there
- Global Variables
- Local Variables
- System Defined Variables
Global Variables:-If a variable can be access anywhere in an object, its said to have ‘Global’ scope.
Local Variables:-If the accessibility is limited to a single trigger in an object, that type of variable is called ‘Local’ variable.
System Defined Variables:- A variable that is maintained automatically by the system. Examples- Rec in Table object, CurrReport in Report object
Sample Program to display a Stored Data
This session describes how to define a variable as particular Data type and display their contents.
First up all we will see the assigning a text to a ‘text’ variable and display there contents in a message box.
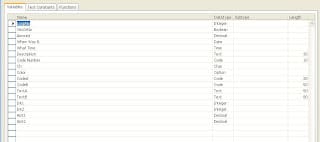
- For doing this you have to first define the variable as text variable for that goto the Tools -> Object Designer
- Open the object you want to do coding. (for how to open a C/AL Editor see the C/AL Editor page)
- After open the C/AL editor goto the View -> C/AL Globals
- Go to the Variables tab and enter the Name as your text name let us say “sampletext”
- Go to the Datatype column, here you can specify the datatype of the variable
- Got to the Length column type 30. ie, is the space where specifies the length of the text.
Variables defining area looks like follows
After defining this press Esc and goto the normal C/AL Editor window and type the following text in the OnRun()
————————————————————————————
sampletext := 'My Sample Text';
MESSAGE('The Value of %1 Is %2', 'sample text',sampletext);
————————————————————————————
Then you will get a output like the following when you run the program.

Self Practice Topic 2
Variables & Datatypes Area
1)Create an Integer Item named minimum and store the value 100 and display the data in a Message Box when the page run.
2) Create a program to add two decimal numbers and display the result in a Message box when the object run.
Answers:
1)Here i am not specifying how to define a variable, i think you already understand how to define that from the previous post. Only diff is that you have to define the variable in the Datatype column as integer.
The program code for display that was
mynum := 5;

MESSAGE('The Value Of %1 Is %2', 'mynum', mynum);
———————————————————–
2) For doing this you have to define 2 variables as Decimal numbers.
Let us consider Num1 and Num2 , the result storing and display from the Result variable
the programming codes are as follows
Num1 := 2;

Num2 := 7;

Result := Num1 + Num2;

MESSAGE('The Value Of %1 Is %2', 'Result', Result);
———————————————————-
The result will be 9
Expressions In Microsoft Dynamics C/AL
Definition : Expression
An Expression is a formula telling the computer how to generate the desired value. Like a variable and a constant, an expression has a type and value. A expression must be evaluated at run-time in order to determine its value. Although a constant’s value is known at all times, a variable value is determined at run time, the system must look it up in memory.
Examples
Quantity * DirectUnitCost
Expressions Function Calls
Expression function call are the type of function calls that calls from the expression itself.
If you try to assign too many characters to a string variable, you will get a runtime error. How this overcomed, since the error doesnot occur until the program is running? One of the method to overcome this is to design your program such that this error could never happen. In some cases using another method.
MAXSTRLEN Function
MAXSTRLEN function will tell you at runtime the maximum legth of a string that can fit in a variable. It has one parameter, which is the variable in question. The return value is of type integer.
Let us consider the following programing code
————————————————————————————-
Description := COPYSTR('The message is: ' + CodeB,1, MAXSTRLEN(Description));
————————————————————————————-
Where Description is a type text variable of length 30 and CodeB is the type of datatype ‘Code’ with size 50.
Once we use this type of coding style then the error will not through the system because only the Maximum string length only copying and displaying.
Logical and Relational Operators In The Microsoft Dynamics NAV C/AL
Logical and Relational operators are always result in a boolean value ie, either TRUE or FALSE.
Relational Operator
Relational operator is used in the relational expressions to test a relationship between the term preceding it and the term following it, resulting in a boolean value.
These operators are listed below
- = (equal to)
- IN (Included in set)
- < (less than)
- > (grater than)
- <= (less than or equal to)
- <> (not equal to)
Logical Operator
Logical operator uses one or two Boolean terms in a logical expression. The logical binary operators are AND, OR and XOR (exclusive or). The one logical unary operator is NOT.
Form Designing And Executing In Microsoft Dynamics NAV(Navision) Using C/AL
By this topic I will tell how to design a Microsoft Dynamics NAV Form Designing and Exceptions of a simple program.
There are mainly 5 steps we have to care when we design a Simple Form without using table in the Dynamics NAV.
- Designing Form
- Defining Variables
- Assigning Variables to the designed form objects
- Create a program code to execute the form
- Run the form
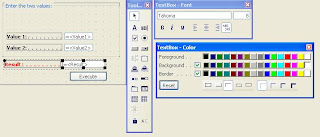
- Designing Form:- For design a form you have to first goto the Tools -> Object Designer -> Form. Then click on the New Button. Select create a blank formandpress ok. After opening that select from the menu View -> Toll Boox, View ->Font , View -> Color.
Tool Box is the area where containing all the tools need to be included in the form like Label, Button, Text Box.
Font is the area where we can manage all the font related activites of the text. First click on the Add Label option in the Tool Box.
Color is the area where we can assign colors to different objects.
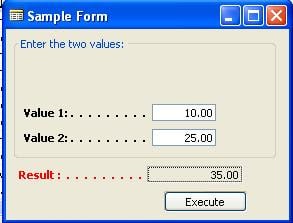
After selecting these boxes you have to go-to the Tool Box and select the Tool Frame and place them in the form, next click Add Label, then click text box notice that both the label and text boxes created at a stretch. You have to place 3 text boxes in the form and one Command Button from the Tool Box. Our aim is to add the value of two items and display the value in the third one named Result.
Defining Variables:- For doing the above problem we have to define 3 variables named Value1,Value2 and Result. For doing this goto the View C/AL Globals section and enter the 3 variables as Decimal Data types. ie, Value1 – Decimal, Value2 – Decimal, Result– Decimal.For defining these refer http://mibutech.blogspot.com/2010/02/sample-program-to-display-stored-data.html link.
Assigning Variables to the designed form objects:- For asigning values to the object is the main area where we are connecting our designed objects to the variables we are defined.
For doing this we have to select each and every text box one by one and then Goto the View -> Properties option, there look the SourceExpr and then drill down the options in the right side and select one by one variables and assign. i.e, click on the first text box and then assign the Value1, select second text box and assign the Source expr as Value2 and in the Third one assign Result. After doing this you will see following type screen.
Create a program code to execute the form:- For calculate something using the objects input data we have to define the programming code. A sample program for calculate the addition of Value1 and Value2 and display the value in the Result is as follows.
—————————————————————————————–
Result := Value1 + Value2;
—————————————————————————————–
You have to place this in the Form OnRun(). For doing this click design buttor in the Object desginer-> Form. Goto the OnRun() and type folowing code there.
Run the form:- For run the form you have to open the Object designer then press the Run Button. Then the following picture like result you will get.
IF – THEN And IF – THEN – ELSE Statement In Microsoft Dynamics NAV
IF Statement In Microsoft Dynamics NAV
IF Statement is the most commonly used conditional statement that work based upon the statement is TRUE or FALSE.
Conditional Statements works like first check one condition and based upon the result of this condition further flow of the program happened. Microsoft Dynamics NAV(previously Navision) language C/AL is used other conditional statements too.
If statement or IF loop is used execute a code when a purticular statement is TRUE only and some case its used to execute some statements when the statement is FALSE too.
There are mainly 2 types of IF statement specifications
- IF – THEN Syntax
- IF – THEN – ELSE Syntax
IF – THEN Syntax : –
In this type of IF statements you have to use following type of syntax
IF boolean expression THEN statement
This statement works in a manner that first the Boolean expression is evaluated and if the value is TRUE then the Statement excuted and if the Boolean expression is FALSE then the statements after the IF statement is executed. ie, the program skips the IF statements.
For example consider the following example:
======================================
IF Total > 50 THEN

    MESSAGE('Total Value is grater than 50');
======================================
In this sample codes we checking that if the Total is grater than 50 or not and if the value is grater than 50 we are displaying a message that Total Value is grater than 50.
Note that the statement is indented 2 characters, this is because of the better programing practice only. We can put these codes without these space also executing the same result also we can put these statements in immediately preceding the THEN statements.
IF – THEN – ELSE Syntax :-
In this type of IF statements you have to use following type of syntax
IF Boolean expression THEN statement1 ELSE statement2
This time its works in the manner that if the Boolean expression is true then execute the statement1 and if the condition is false then execute statement2.
For example consider the following example:
=======================================
IF Total > 50 THEN

    MESSAGE('Total Value is grater than 50')

ELSE

   MESSAGE('Total Value is Less than or Equal to 50');
=======================================
In this sample codes we checking that if the Total is grater than 50 or not and if the value is grater than 50 we are displaying a message that Total Value is grater than 50. And if the value is less than or equal to that then display Total Value is Less than or Equal to 50.
EXIT Statement
EXIT Statement In Microsoft Dynamics NAV
EXIT statement is a type of statements that used for skip following program trigger for avoiding errors or other purpose. Whenever an EXIT statement was there the program quit further moving the codes of that trigger and the control backs to the objects.
For exaple consider the following codes
=============================================
IF Quantity = 0  THEN

  EXIT;

Unit Price := Total Price / Quantity;
=============================================
This statement works in a manner that once the Quantity value will be ‘0’ then the program skip the codes preceding that for avoiding the division by zero error.
Comment
Comment In Microsoft Dynamics NAV
What is a Comment?
Comment is the useful information to identify or represent a programming code.
The comment statements are not executable so we can comment the programming codes that no need to execute also.
Types Of Comments
Mainly 3 types of comments available in the Microsoft Dynamics NAV C/AL.
- Single Line Comment
- Block Of Comment
- Nested Comments
- Single Line Comments :- Single line comments are types of comments that can used to comments single line of codes. In this case, this single line comment ignore by the compiler. The Syntax used is ‘//’. ie, if we are placing // in any of the program codes then after that text is consider to be comment.
For Example:
================================================
//Sample code for Comment showing adding two numbers

A := B + C;
================================================
- Block Of Comment:- Block comments are comments that allow multiline comment. Block comments start with ‘{‘ bracket and closing with ‘}’. ie, the text between these brackets are considered as comment portion and this cannot be repeated.
For Example:
================================================
//Sample Block comment

{

text1........

text2......

text3

}
================================================
- Nested Comments:- Nested Comments are types comments that represent comments in the form, a comment containing another comment. ie, the brackets of ‘{‘ is started but inside of that also another ‘{‘ rather than ‘}’.
For example :
================================================
//Nested Comment

{

text1........

                    {

                       text2......

                       text4..................

                      }

text3

}
================================================
Combound Statements
Combound Statements In Microsoft Dynamics NAV
Combound Statements are statements that can be used to represent multiline statements in the IF, WHILE etc like statements.
Sysntax for combound statements are
BEGIN Statement1 {; Statement2} END
For example :
=====================================
IF Quantity <> 0 THEN

     BEGIN

              UnitPrice := ExtendedPrice / Quantity;

              TotalPrice := TotalPrice + ExtendedPrice;

     END;
=====================================
Arrays
Arrays In Microsoft Dynamics NAV
Definition:
Arrays are special type of variables that have more functionality than the simple variable or normal variables.
An Arrays is a complex variable that actually holds group of variables and these groups is defined once with a single identifier and a single datatype.
For Example:
Identifier : QuantityArray
Data Type: Integer
Different Terms of Arrays
Index
Index is used to refer to single element in an array
Element
An element is a single variable in an array.
To access the 5 element in the array of QuantityArray, you have to specify like
QuantityArray[5]
Dimension
An array can be specified in different dimensions. In the above example QuantityArray[5] is a type of one dimensional array. Array dimension can be one or more. But one dimension arrays more simpler than multidimension arrays. For specifying the Complex data we are using Muli-dimensional arrays.
Syntax Of Arrays
Syntax Of Arrays In Microsoft Dynamics
Synatax
An array have to define in the following format of syntax only in the Navision (Microsoft Dynamics NAV) C/AL.
Identifier [Index Expression1] , [Index Expression 2] , etc .
The ‘Identifier’ is the Variable identification of an array and this need to include any types of arrays. Only the difference occur in the ‘Index Expression’ area only. ie, If we need Single dimension array then we need only Index Expression1. In that case following will be the sysntax
Identifier [Index Expression1]
Exapmple : A[3]
In the case of Two dimensional array we have to mension upto Index Expression2.
And in the case of Three Dimensional Arrays we have to mension Index Expression1, Index Expression2, Index Expression3.
How to assingn values to the Arrays?
To assign values to the array element 4 as 50 then you have to mension in the following format.
A[4] := 50;
CLEAR
CLEAR() In Microsoft Dynamics NAV C/AL
CLEAR() is used to clear the Variable. The sysntax of CLEAR() is
CLEAR(Variable);
CLEAR () clears the variable in the manner like if the Variable is Integer then the Variable value reset to zero. And if the variable is String then the Variable value reset to empty.
For Exapmple,
If you want to reset a Result variable that stores the sum of previous calculation then you have to mension
CLEAR(Result);
After executing this line the calue Result goes to zero.
So the CLEAR () is most usable function in the good C/AL programing.
Repetitive Statements or Loop
Repetitive Statements or Loop
Repetitive Statements or Loops are using when we want to execute one statement or more than one statement multiple times. In the case of IF loop it will work only for one time execution only. So if the user need to execute a statement more than one times based upon some condition.
All the repetitive statements are works in a manner like that it will work repetedly until one condition satisfy and if that condition appear then it moves the control to next programming satement after the repetitive statements. And in the case of repetitive statements always having initialize variable and increment values will appear.
Some of the Repetitive statements are
IF Statement, WHILE .. DO, REPEAT .. UNTIL etc.
FOR Loop
FOR Loop or FOR Statement In Microsoft Dynamics NAV
Definition
FOR loop is a repetitive statement or loop, is used when we need to execute the code a predetermined number of times.
FOR Loop in Microsoft Dynamics NAV, C/AL having mainly 2 types
- FOR .. TO Loop
- FOR .. DOWNTO Loop
FOR .. TO Loop
In the case of FOR .. TO Loop the value checking is incresed format and when the value reach the condition wrong then exit loop.
Syntax of FOR .. TO Loop:
————————————————————–
FOR Control Variable := Start Value TO End Value
DO Statement
————————————————————–
Here Control Variable must be a variable type of Boolean, Date, time or any numeric type. The Start value and End Value must be either expressions of same data type.
For Example:
===========================================
FOR i :=1 TO 5 DO

    Result := Result + 5;
===========================================
In this programming codes works in a manner that first intialize the value i to 1 and then check the condition that whether the i less than 5, i=”i+1″
FOR .. DOWNTO Loop
In the case of FOR .. DOWNTO Loop the value checking is decresed format and when the value reach the condition wrong then exit loop.
Syntax of FOR .. DOWNTO Loop:
————————————————————–
FOR Control Variable := Start Value DOWNTO End Value
DO Statement
————————————————————–
The Control Variable, Start Value and End Value are same as FOR .. TO Loop. Only difference is that in the case of FOR .. TO Loop Control Variable is in the Increase format but in the case of FOR .. DOWNTO Loop decrese format.
For Example:
===========================================
FOR i :=5 DOWNTO 1 DO

    Result := Result + 5;
===========================================
In this case programming code work in the manner like first assign the value 5 to i and then check the value 5>1 and then do the statements following. Next time i value decrease by 1 and then check the condition and soon.
WHILE .. DO Loop
WHILE .. DO Loop or Statement In Microsoft Dynamics NAV C/AL
Definition
The WHILE .. DO Loop is a repetitive statement or loop, is used in the program where a certain code is to be executed as long as some condition is true.
Syntax Of WHILE .. DO Loop
—————————————————–
WHILE Boolean Expression DO Statement
—————————————————–
This is simpler than the IF loop. In the case of WHILE .. DO Loop the system check continously the boolean expression become true then the statement between BEGIN and END execute otherwise move to next statement.
For Example:
==================================================
WHILE Sales[i+1] <> 0 DO BEGIN

     i := i + 1;

     Total Sales :=  Total Sales + Sales[i];

END;
==================================================
This is work in a manner like that check every time the Sales[i+1] <> 0 and if the condition is true then execute the statement between BEGIN and END other wise execute after the END statement.
REPEAT – UNTIL Loop
REPEAT – UNTIL Loop or Statement In Microsoft Dynamics NAV C/AL
Definition
REPEAT – UNTIL Loop is a repetitive loop, is used for programmers having one or more statements to be executed until some condition.
Syntax OF REPEAT – UNTIL Loop
—————————————————
REPEAT Satements UNTIL Boolean Expression
—————————————————
This works in a manner like that it will work the statements until the Boolean Expression is true. The difference Between WHILE-DO loop is that the REPEAT – UNTIL Loop will execute atleast one time and then only it will check the Boolean expression true or false. But in the case of WHILE-DO loop only execute the code when a particular condition is true.
For Example:
=======================================
REPEAT
i := i + 1;
Total Sales := Total Sales + Sales[i];
UNTIL Sales[i]=0;
=======================================
The above example works in a manner like that it will execute the statement once after that check the Boolean expression Sales[i]=0 or not if the condition is true then repeat the statement otherwise it will exit from the loop and execute the statement immediately after that.
WITH Loop / Statement
WITH Loop / Statement
WITH Statement or loop is used to make record variables easier.
Record variable is a complex datatype with one variable we can store multiple values like arrays. Each record having different fields and each of these fields can able to store different data types also. These fields are separated by the ‘.‘ or dot sign. If a customer record having field named Name then it can be specified like customer.Name
Syntax Of WITH Loop
Suppose we having three fields names name, address and City then it can be specified in the recod named customer as folows
customer.Name := Txt[1];
customer.Address := Txt[2];
customer.City := Txt[3];
We can sort these kind of representation in the system different way so that we can minimise the number of codings that syntax of WITH Loop is as follows
—————————————————————————-
WITH Record Variable DO Statement
—————————————————————————-
By the help of this syntax we can remodify the abow code as following type of codes
=====================================================
WITH customer DO BEGIN

                             Name := Txt[1];

                             Address := Txt[2];

                             City := Txt[3];

                  END;
=====================================================
Once we cross check the above codes we found that the Record variable is not found with any of the fields. The computer will automatically know the identification about each fields assigned to the records.
CASE
CASE Loop or Statements
CASE Loop or statements is a conditional statement.
Like IF loop or statement these also works in the manner that once the statement is true then some statements are executed other wise the else part will be executed. But in the case of CASE we can consolidate muliple levels of IFloops in one CASE. Some programming languages like C its called as SWITCH – CASE loop but in Navision or Microsoft Dynamics NAV we called this as CASE only.
Syntax of CASE
———————————————————–
CASE Expression OF

               Value Set 1 : Statement 1;

               Value Set 2 : Statement 2;

                 ...

               Value Set n : Statement n;

             ELSE Statement n+1;

         END
———————————————————–
A sample program for the CASE is as follows
==============================================================
CASE Color OF

          Color :: Orange:

                             MESSAGE('COLOR IS ORANGE');

          Color :: Red,Color :: Green:

                             MESSAGE('COLOR IS RED OR GREEN');

            ELSE

                             MESSAGE('COLOR NOT ORANGE,RED OR GREEN');

      END
==============================================================
FUNCTIONS IN MICROSOFT DYNAMICS
FUNCTIONS IN MICROSOFT DYNAMICS
Definition
Functions are named portions of a program, some times called as Subprogram or Subroutine.
When a function is called from a set of programming code then current programming code is suspended and continued with a trigger code. And after the completion of that trigger the program control return to the origin.
A function can be used as expression also
For example:
TotalCost := Qty * CalculatePrice
In this code CalculatePrice is one function that calculate the price and after the calculation it return some value based upon that further programming codes executes.
Built In Functions
In Microsoft Dynamics C/SIDE programming using some built in functions also. These programming codes cannot be viewed by the users and it cannot be modified.
Some of the built in functions are as follows
- MESSAGE :- Displays a message on the screen.
- MAXSTRLEN :- Return defined legth of string variable.
- COPYSTR :- Returns part of a string
- CLEAR :- Clears the passed in variable
- ARRAYLEN :- Returns number of elements in an array.
FUNCTION PARAMETERS
FUNCTION PARAMETERS IN MICROSOFT DYNAMICS
Function parameter is one or more variables or expressions that are sent to the function through a function call. These parameters provided for function information also can able to modify that information. If there is more than one parameter, the parameters will be sepearated by commas.
There are mainly 2 types of parameter passing occur
- Pass By Value
- Pass By Reference
- Pass By Value:- In this type of parameter passing only pass some values only. If we change thse values then it will not affect in the parent trigger or values. That is once pass the value it will not affect any kind of changes in the parent method, its only passing the value.
- Pass By Reference:- In this kind of parameters its pass like reference of the variable, sometimes called name of the variable. Whenever we change the value of these variables it will affect the parent trigger also. Because in this type the computer knows the exact storage space of that variable or parameter.
LOCAL FUNCTIONS AND VARIABLES
LOCAL FUNCTIONS AND VARIABLES Local Functions
A local function is a function that can be called in the object in which it is defined. Any function that not be defined by local function called from other objects as well as the objects from which its defined.
Local Variables
A local variable is available whose scope is limited to single function. This means that in this function trigger code, a local variable can be used like any other variable. If the name of a local variable is referred outside of the function in which it is defined, syntax error will result.
Common challenges for C/AL beginners include unfamiliar syntax, limited resources, integration complexities, a lack of practical experience, complex business logic, version compatibility issues, troubleshooting skills, and isolation from the wider programming ecosystem. Solutions involve starting with basic concepts, seeking comprehensive resources, hands-on practice, breaking down complex logic, staying updated on versions, and actively troubleshooting errors. I believe after going through this blog post, you will feel relaxed about some of these issues.
Microsoft Dynamics NAV/Navision utilized the C/AL programming language for customization or solution development. However, it’s important to note that the Business Central application employs the AL programming language.
Read More:
")
Hi Jubel,
I believe I have found exactly what I was looking for. Thank you for writing and sharing such an excellent tutorial on C/AL. Could you please let me know if there is a way to obtain a PDF version of this tutorial, as well as any other available Dynamics Navision 2018 developer tutorials?
Thank you once again for your valuable contribution.
Best regards