Table of Contents
You do not have access to Microsoft Dynamics NAV or D 365 Business Central Error
Add User to D 365 Business Central / Microsoft Dynamics NAV 2018 Database or Lower
NAV Error Message
Are you getting following error on Dynamics NAV
“You do not have access to Microsoft Dynamics NAV. Verify that you have been setup as a Valid user in Dynamics NAV”
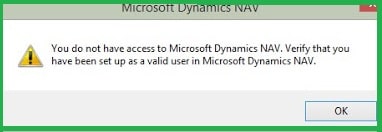
This error may arrived on any of the following NAV versions
- Microsoft Dynamics NAV 2013 (7.0)
- Microsoft Dynamics NAV 2013 R2 (7.1)
- Microsoft Dynamics NAV 2015 (8.0)
- Microsoft Dynamics NAV 2016 (9.0)
- Microsoft Dynamics NAV 2017 (10.0)
- Microsoft Dynamics NAV 2018 (11.0)
- Microsoft Dynamics 365 Business Central
Route Cause
You have restored database on a server where the actual list available on the Dynamics NAV not exist.
For example, You have taken the DB backup from a Live Server where following User IDs exist.
- User ID 1 or Domain / User ID 1
- User ID 2 or Domain / User ID 2
But the on the restoring server domain login not equal to both.
- On Test Server / Restored server exist only User ID 3 or Domain / User ID 3
Resolution
Most of the times when you have tried to add the user in the SQL then also issue not resolved. This is due to failure of one of the following required security requirement.
- SQL Server not user to DB restored
- Dynamics NAV not having windows login of login-ed system.
For resetting the User Related tables data use the following method to delete the same via SQL (Easiest Method)
For opening the SQL Server – Type “ssms” in run command and open SQL server management studio.
SQL Query
USE [Your New Database Name]
GO
delete from [dbo].[User]
delete from [dbo].[Access Control]
delete from [dbo].[User Property]
delete from [dbo].[Page Data Personalization]
delete from [dbo].[User Default Style Sheet]
delete from [dbo].[User Metadata]
delete from [dbo].[User Personalization]
USE [Your New Database Name]
GO
delete from [dbo].[User]
delete from [dbo].[Access Control]
delete from [dbo].[User Property]
delete from [dbo].[Page Data Personalization]
delete from [dbo].[User Default Style Sheet]
delete from [dbo].[User Metadata]
delete from [dbo].[User Personalization]
Where Your New Database Name should replace with your database name. If your database name is “Demo Database NAV (7-1)” then use following code on first line
USE [Demo Database NAV (7-1)]
Then press Ctrl + N open the SQL Query page and paste the above code and Execute.
Caution: Once you execute this all user related records will delete. You have recreate the same
Once you have done this please process following steps as well.
Please try to reopen the Dynamics NAV.
Some times still issue will not resolve then please follow below steps as well.
Solution Summary as follows.
You will get the permanent solution in following 4 Steps
- Open Windows PowerShell ISE
- Import the Module to activate Dynamics NAV commands
- Refresh Commands
- Create New User ID via Power shell
- Assign new Permissions to newly created User ID
1) Open Windows PowerShell ISE
To open the Windows PowerShell ISE , you have to type ISE or Windows PowerShell ISE search.
Once you do then will get following screen (left).
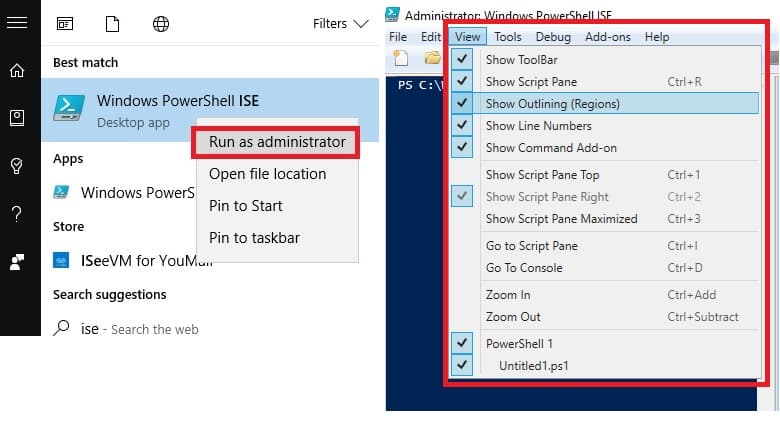
Make sure that you have opening the Windows Power Shell in “Run as Administrator” option to get better result.
Once you open the Windows power shell need make sure right side like windows selected on Windows Power Shell on View menu (This is to make sure all the necessary windows are enabled for view and better understanding only)
Once you complete this first step is over.
2) Import the Module to activate Dynamics NAV commands
Next step is to Import the NAV cmdlet command via Windows Power Shell
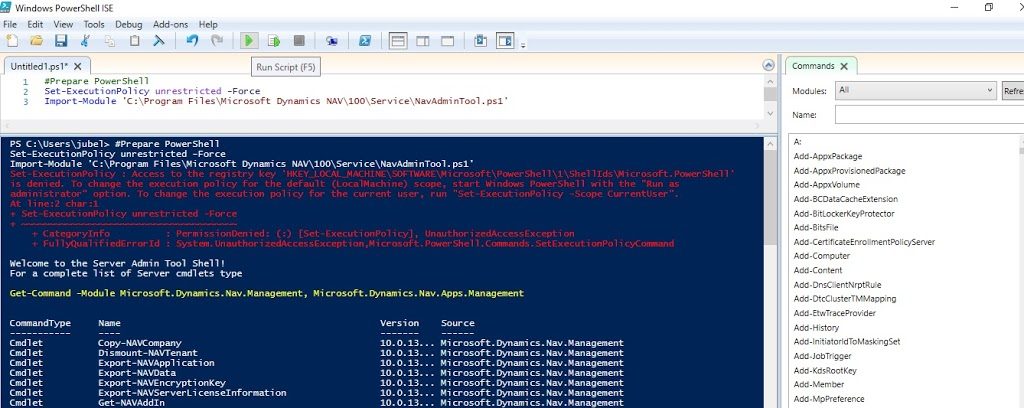
Note below Query is for the Dynamics NAV 2018 version. If you want to perform the same for other versions the please copy corresponding version queries.
Set-ExecutionPolicy unrestricted -Force
Import-Module 'C:\Program Files\Microsoft Dynamics NAV\110\Service\NavAdminTool.ps1'
For entering the command you have paste the given the command on white space available on the above screen.
Once you enter the command just press F5 to execute or as mentioned in the image click on to the green symbol with right arrow.
Dynamics 365 Business Central
Following script needs to be add when you are using Business Central database with version after April 2019 (14).
April 2026 Wave 1 Version
Set-ExecutionPolicy unrestricted -Force
Import-Module 'C:\Program Files\Microsoft Dynamics 365 Business Central\280\Service\NavAdminTool.ps1'
October 2025 Wave 2 Version
Set-ExecutionPolicy unrestricted -Force
Import-Module 'C:\Program Files\Microsoft Dynamics 365 Business Central\270\Service\NavAdminTool.ps1'
April 2025 Wave 1 Version
Set-ExecutionPolicy unrestricted -Force
Import-Module 'C:\Program Files\Microsoft Dynamics 365 Business Central\260\Service\NavAdminTool.ps1'
October 2024 Wave 2 Version
Set-ExecutionPolicy unrestricted -Force
Import-Module 'C:\Program Files\Microsoft Dynamics 365 Business Central\250\Service\NavAdminTool.ps1'
April 2024 Wave 1 Version
Set-ExecutionPolicy unrestricted -Force
Import-Module 'C:\Program Files\Microsoft Dynamics 365 Business Central\240\Service\NavAdminTool.ps1'
October 2023 Wave 2 Version
Set-ExecutionPolicy unrestricted -Force
Import-Module 'C:\Program Files\Microsoft Dynamics 365 Business Central\230\Service\NavAdminTool.ps1'
April 2023 Wave 1 Version
Set-ExecutionPolicy unrestricted -Force
Import-Module 'C:\Program Files\Microsoft Dynamics 365 Business Central\220\Service\NavAdminTool.ps1'
October 2022 Wave 2 Version
Set-ExecutionPolicy unrestricted -Force
Import-Module 'C:\Program Files\Microsoft Dynamics 365 Business Central\210\Service\NavAdminTool.ps1'
April 2022 Wave 1 Version
Set-ExecutionPolicy unrestricted -Force
Import-Module 'C:\Program Files\Microsoft Dynamics 365 Business Central\200\Service\NavAdminTool.ps1'
October 2021 Wave 2 Version
Set-ExecutionPolicy unrestricted -Force
Import-Module 'C:\Program Files\Microsoft Dynamics 365 Business Central\190\Service\NavAdminTool.ps1'
April 2021 Wave 1 Version
Set-ExecutionPolicy unrestricted -Force
Import-Module 'C:\Program Files\Microsoft Dynamics 365 Business Central\180\Service\NavAdminTool.ps1'
October 2020 Wave 2 Version
Set-ExecutionPolicy unrestricted -Force
Import-Module 'C:\Program Files\Microsoft Dynamics 365 Business Central\170\Service\NavAdminTool.ps1'
April 2020 Wave 1 Version
Set-ExecutionPolicy unrestricted -Force
Import-Module 'C:\Program Files\Microsoft Dynamics 365 Business Central\160\Service\NavAdminTool.ps1'
October 2019 Version
Set-ExecutionPolicy unrestricted -Force
Import-Module 'C:\Program Files\Microsoft Dynamics 365 Business Central\140\Service\NavAdminTool.ps1'
April 2019 (14)
Set-ExecutionPolicy unrestricted -Force
Import-Module 'C:\Program Files\Microsoft Dynamics 365 Business Central\140\Service\NavAdminTool.ps1'
Dynamics NAV 2013
Set-ExecutionPolicy unrestricted -Force
Import-Module 'C:\Program Files\Microsoft Dynamics NAV\70\Service\NavAdminTool.ps1'
Dynamics NAV 2013 R2
Set-ExecutionPolicy unrestricted -Force
Import-Module 'C:\Program Files\Microsoft Dynamics NAV\71\Service\NavAdminTool.ps1'
Dynamics NAV 2015
Set-ExecutionPolicy unrestricted -Force
Import-Module 'C:\Program Files\Microsoft Dynamics NAV\80\Service\NavAdminTool.ps1'
Dynamics NAV 2016
Set-ExecutionPolicy unrestricted -Force
Import-Module 'C:\Program Files\Microsoft Dynamics NAV\90\Service\NavAdminTool.ps1'
Dynamics NAV 2017
Set-ExecutionPolicy unrestricted -Force
Import-Module 'C:\Program Files\Microsoft Dynamics NAV\100\Service\NavAdminTool.ps1'
Dynamics NAV 2018
Set-ExecutionPolicy unrestricted -Force
Import-Module 'C:\Program Files\Microsoft Dynamics NAV\110\Service\NavAdminTool.ps1'
Note: given path may different depending upon the NAV installation location
Once you execute the command system will automatically import all the necessary commands details for corresponding NAV version. So its important to import the same version module to achieve the desired the results.
3) Refresh Commands
Refresh commands is the 3rd step. For doing this you have to press Refresh on right side Commands column available on the Windows Power Shell screen.
Once you refreshed system will populate the Dynamics NAV commands for the imported version.
FYI specifying the important commands available with the Windows Power Shell option
- Get-NavServerUser – Returns information about all users created in the current Microsoft Dynamics NAV database.
- Get-NAVServerUserPermissionSet – Returns permission set information for Microsoft Dynamics NAV users.
- New-NAVServerUser – Creates a new Microsoft Dynamics NAV user.
- New-NAVServerUserPermissionSet – Assigns a permission set to a Microsoft Dynamics NAV user.
- Remove-NAVServerUser – Deletes a Microsoft Dynamics NAV user.
- Remove-NAVServerUserPermissionSet – Removes a permission set from the list of permission sets that are assigned to a Microsoft Dynamics NAV user.
- Set-NAVServerUser – Changes the configuration settings of an existing Microsoft Dynamics NAV user.
4) Create New User ID via Power shell
You can create new NAV user ID via power shell commands by following steps
Select New-NAVServerUser command and perform the steps given like following screen shot
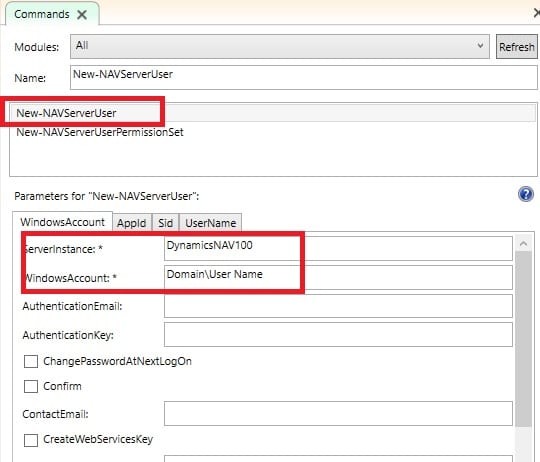
- Enter the “New-NAVServerUser” on Name option
- Once found on the line choose the “New-NAVServerUser“
- Above image like screen will populate after selection of “New-NAVServerUser”
- Fill the ServerInstance of service where new ID need to create
- Fill the Windows Account, Enter the Domain ID / User Name format (If you don’t have any domain then enter the User Name directly)
- Press Run button at the bottom to finalize this
5) Assign new Permissions to newly created User ID
To assign proper permission set to the newly created user then need to follow steps below
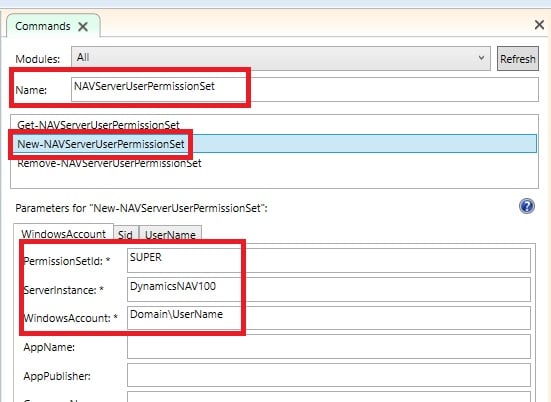
- Enter the “NAVServerUserPermissionSet” on Name option
- Once found on the line choose the “New-NAVServerUserPermissionSet“
- Above image like screen will populate after selection of “New-NAVServerUserPermissionSet”
- Fill the ServerInstance of service where new ID need to create
- Fill the Windows Account, Enter the Domain ID / User Name format (If you don’t have any domain then enter the User Name directly)
- Press Run button at the bottom to finalize this
Well done!!
All the steps are over. Now try to re-open the NAV via client.
")
Thank you so much for this post! It saved my life.
You are well come Natalia.
This is a life save for me as well. Thank you!!!