

In this will explain the Vendor Prepayments process in Business Central. Paying vendors is a normal part of business, but sometimes you need to pay before you receive the goods or services. This is called a prepayment.
Business Central makes handling vendor prepayments very easy. Let us break it down in simple words.
Table of Contents
What is a Vendor Prepayment ?
A vendor prepayment means you pay a part (or full pay) of the purchase order amount in advance.
For Example: You order office chairs worth 1000. The vendor asks you to pay 300 in advance. This 300 is your prepayment.
Why Do Businesses Use Prepayments ?
Following are the key reasons why Business are using Prepayment concept.
- To confirm the order with the vendor
- To build trust with suppliers
- Common practice in industries where goods are customized or imported
Prepayment Prerequisite Setups in Business Central
Before you start using Vendor (or Customer) Prepayments, you need to do some setups in Business Central. Here are the important ones for your information.
Prepayment General Posting Setup
This is the important setup where in General Posting Setup, link the prepayment accounts to posting groups.
In-order to enable Prepayment Accounts, you needs to assign G/L accounts for Sales Prepayments and Purchase Prepayments. These accounts will temporarily hold the advance payment amounts until final invoicing.
Following important fields for the same
- Purch. Prepayments Account : Specifies the number of the general ledger account to post purchase prepayment amounts to.
- Sales Prepayments Account : Specifies the number of the general ledger account to post sales prepayment amounts to.
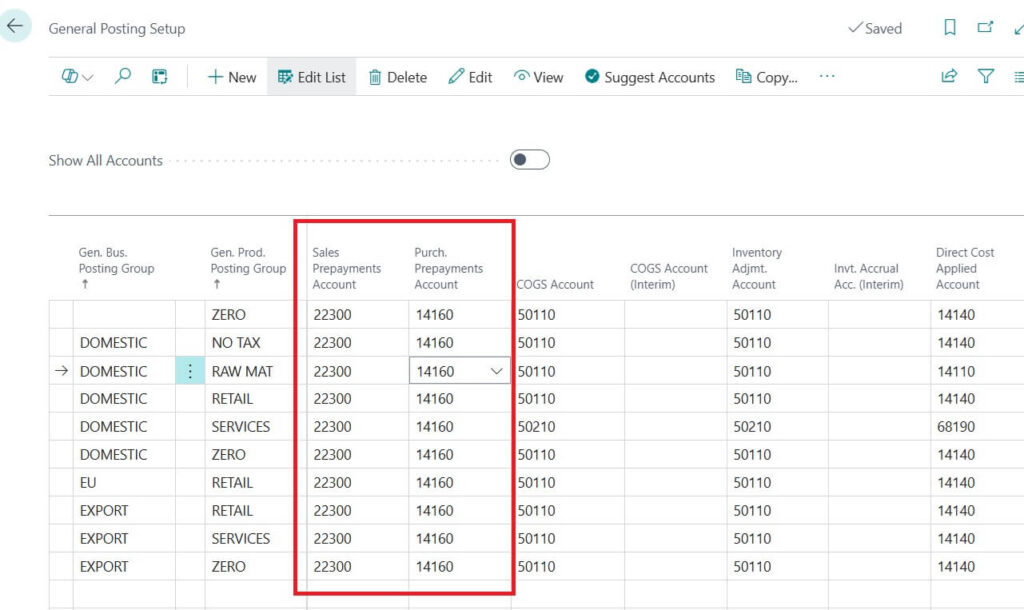
This ensures correct accounting entries when prepayments are posted.
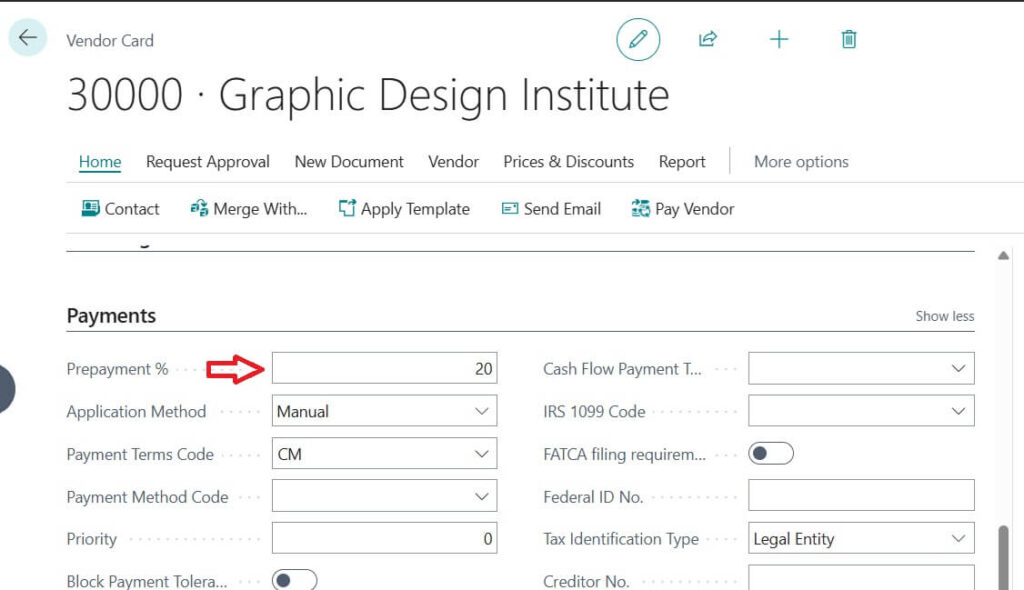
Vendor and Customer Setup
Open the Vendor Card (for supplier prepayments) or Customer Card (for customer prepayments).
In the Prepayment % field, define the default percentage of advance payment (e.g., 20%).
You can override this at the purchase / sales order level if needed.
Purchases & Payables Setup
Purchase and Payables setup you can assign Pre-Payment Number Series required
Following are fields names
- Posted Prepmt. Inv. Nos. : Specifies the code for the number series that will be used to assign numbers to posted purchase prepayment invoices.
- Posted Prepmt. Cr. Memo Nos. : Specifies the code for the number series that will be used to assign numbers to purchase prepayment credit memos.
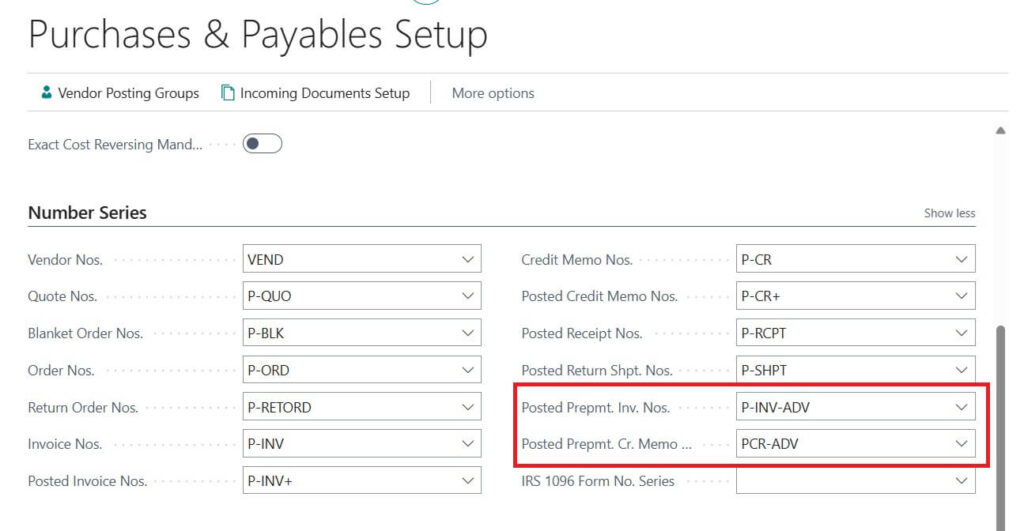
Similar kind of fields available for Sale with Sales & Receivable setup. If you want Prepay feature is Sales then setup over there as well.
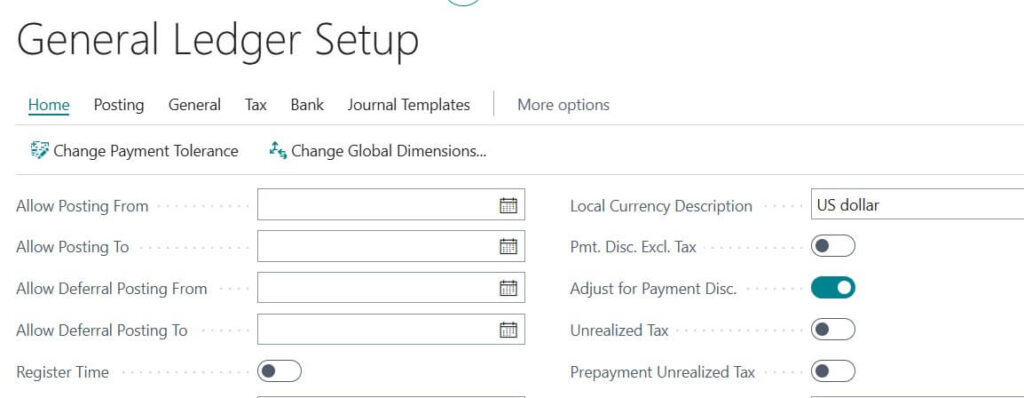
General Ledger Setup
This is optional setup. Go to General Ledger Setup.
Prepayment Unrealized Tax : Specifies whether to handle unrealized Tax on prepayments
If required then only enable this.

VAT Posting Setup (if applicable for you)
If your region requires tax (GST / VAT) on advance payments, you must configure VAT Posting Groups for prepayments.
This ensures the correct tax is applied at the time of advance payment.
Purchase Order Setup
While creating a purchase order, you can define:
- Prepayment % (if different from the vendor card).
- Prepayment Due Date (when the advance must be paid).
Detailed steps for PO advance payment / prepayment will cover next.
How Vendor Prepayments Work in Business Central
Business Central has built in features for vendor prepayments. Following step by step guide help you to understand how it works quick
1. Set Prepayment Percentage
This is the very first step where on the purchase order, you can enter how much percentage should be prepaid.
In Business Central as demonstrated below image dedicated tab available in PO page to manage the prepayment.
Current example default Prepayment % = 20, Came from the vendor master we setup on pre-requite section in this post. if you want to change for current order then its freedom with you.
Following image shows the prepayment dedicated tab available in PO Order page of Business Central

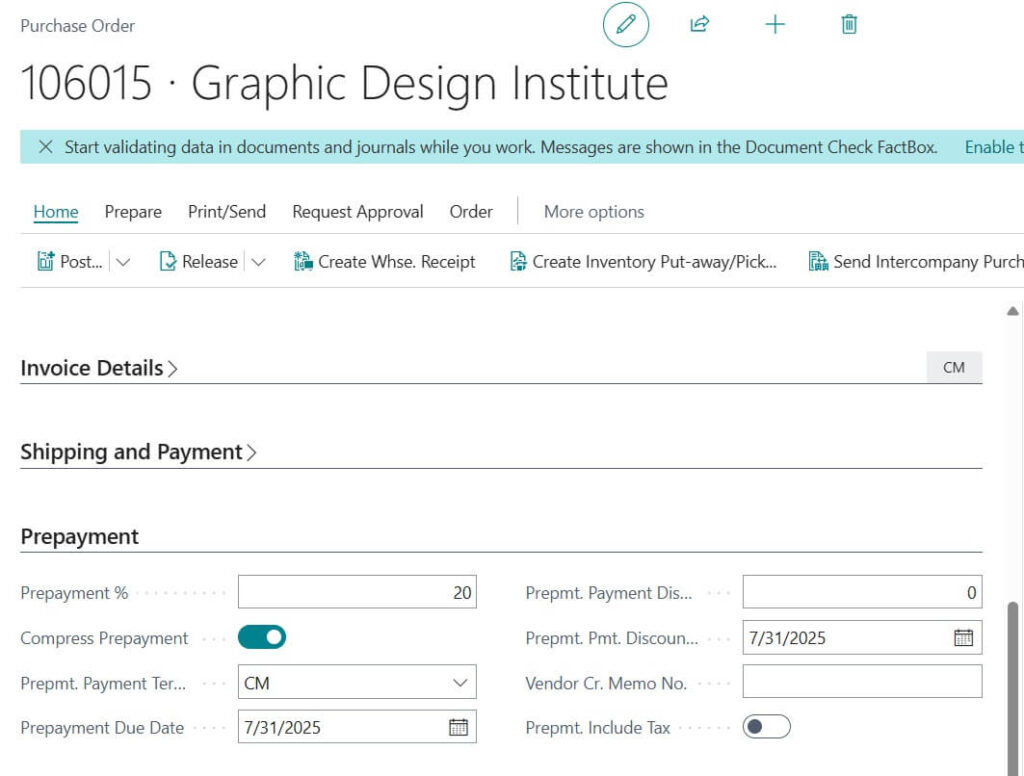
Following are the explanation for other fields exist.
- Compress Prepayment: Combine prepayments if they use the same account or dimensions.
- Prepayment Due Date: The date the prepayment invoice must be paid.
- Prepmt. Payment Discount %: Discount percent for paying the prepayment early.
- Prepmt. Pmt. Discount Date: Last date to pay and still get the discount.
- Vendor Cr. Memo No.: Vendor’s reference number for the purchase order.
- Prepmt. Include Tax: Indicates if sales tax is included in the prepayment.
Note: You may define the Pre-Payment values in PO line part as well. Following image shows the available fields using design.
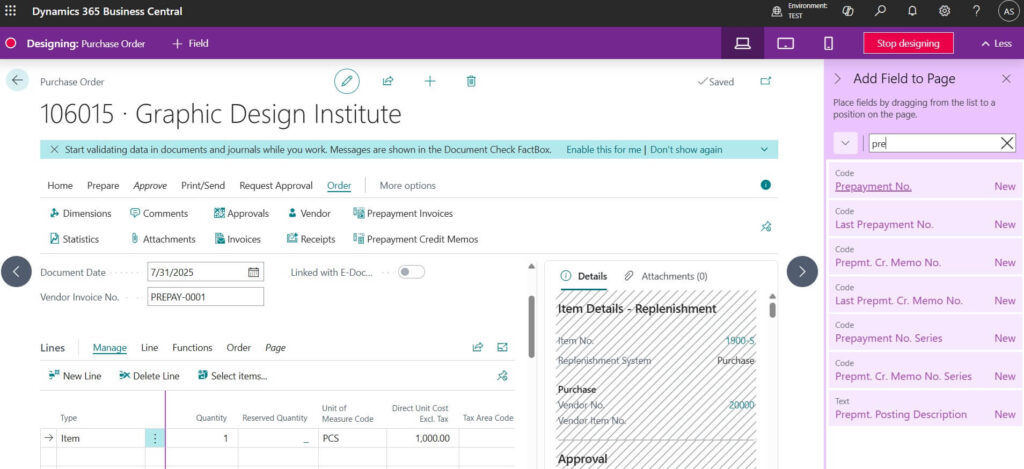
Example: 20% of 1000 Amount = 200.
2. Post Prepayment Invoice
Business Central creates a special invoice just for the prepayment amount.
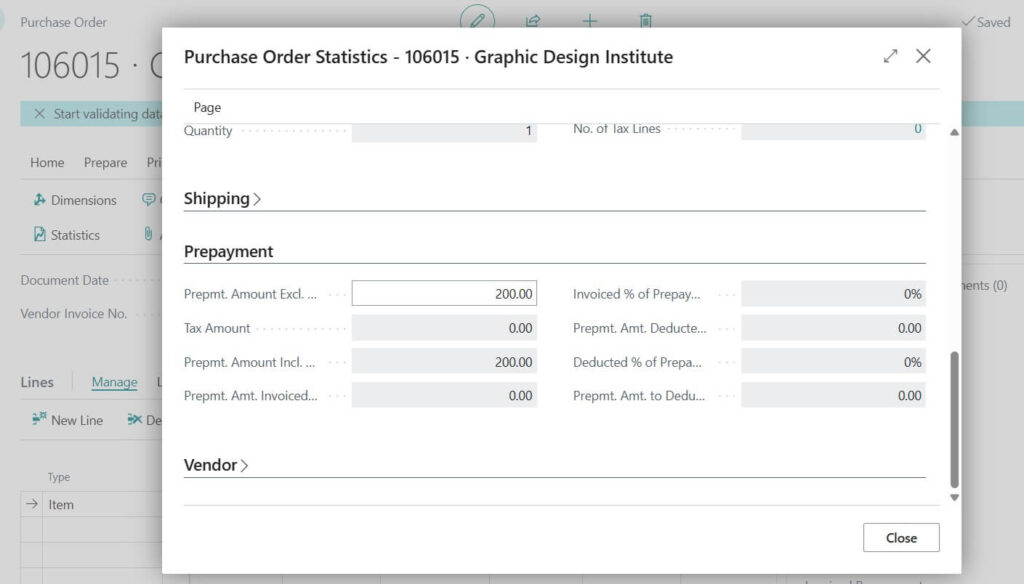
Before posting always recommended to cross check amounts and perform Preview options to check expected GL/ entries impact.
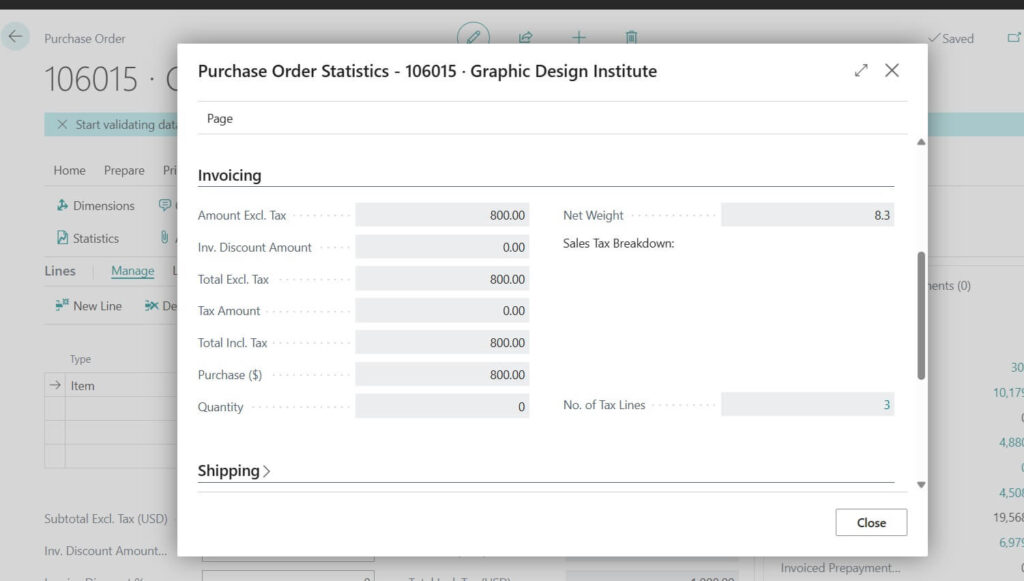
In order do this first step is to check statistics. Following image shows the Prepayment calculation sample on PO Statistics page.

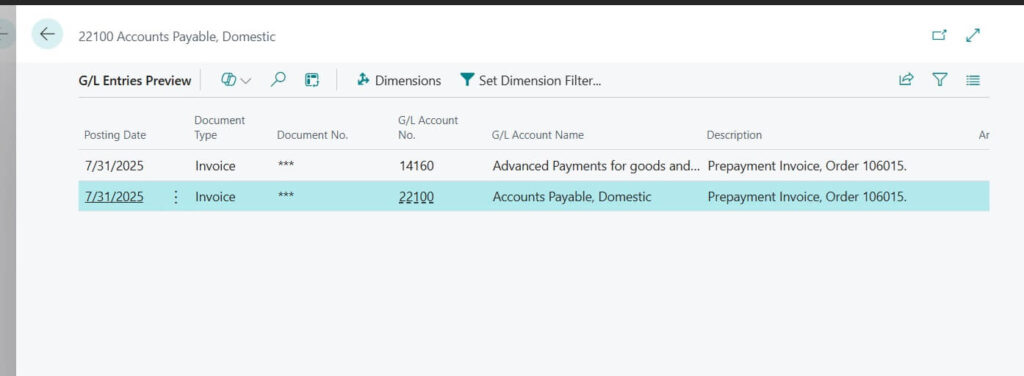
Next step is to check expected posting entries of Pre-payment. Following image shows example

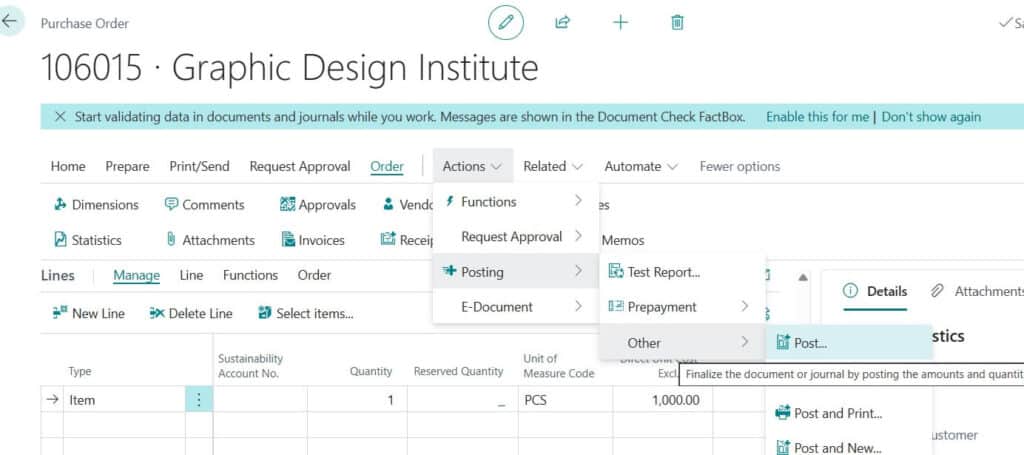
Now important step of posting the Prepayment. For that please following menu path defined in the following image.

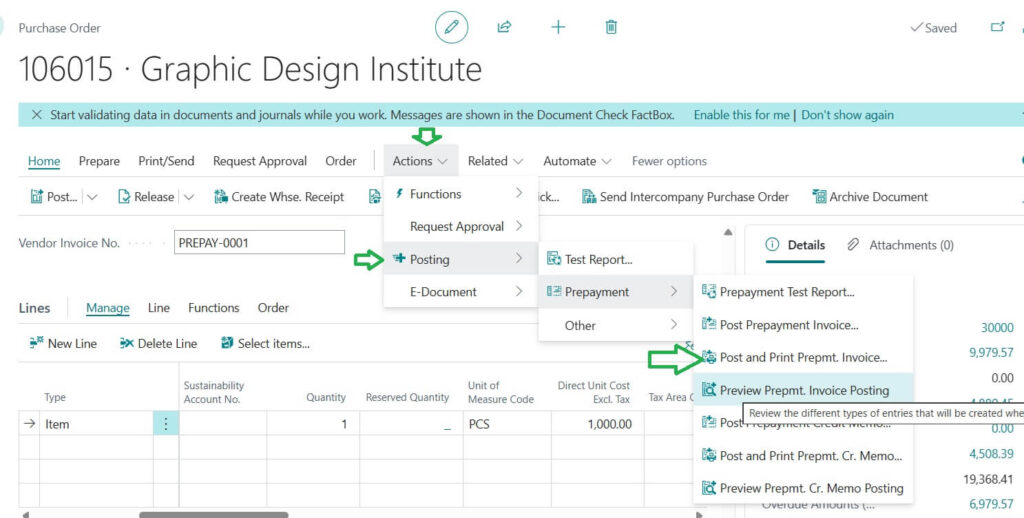
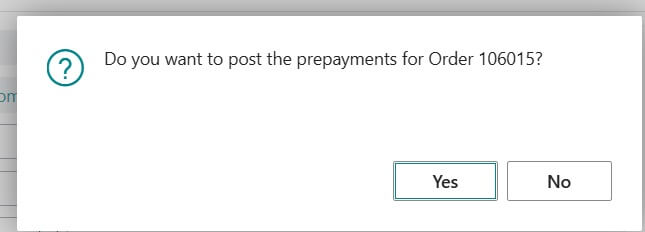
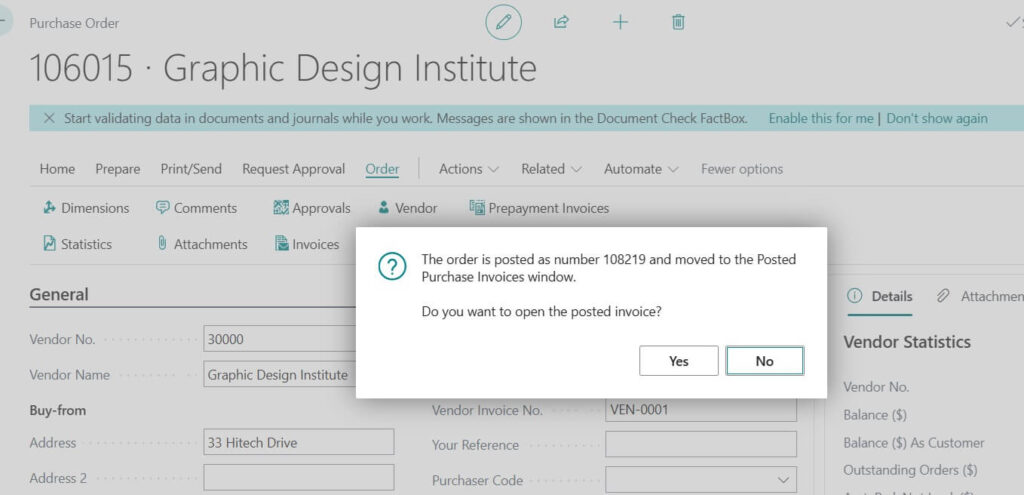
Upon Clicking on Prepayment posting any of the options will ask for confirmation. Once confirmed it will post the same.

You send this invoice to the vendor and pay it.
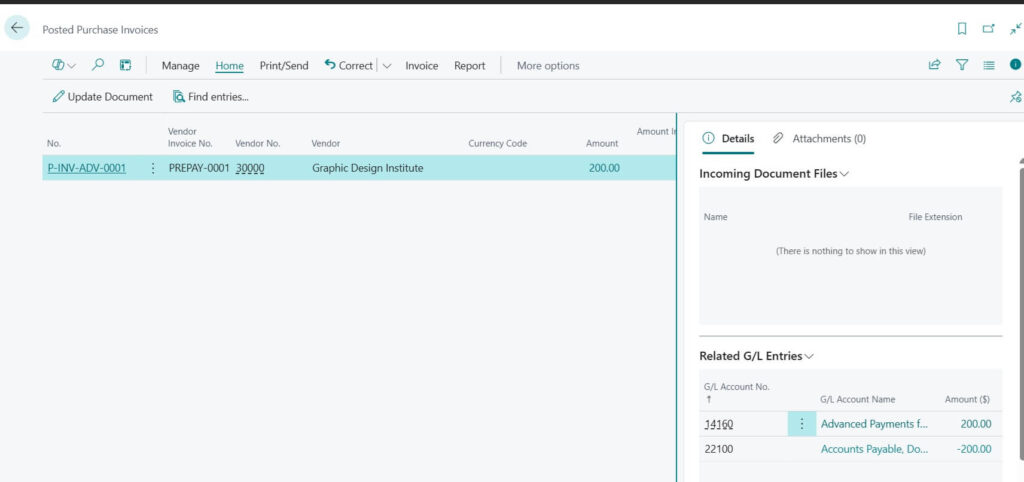
You may check the posted Prepayment Invoices directly from the Purchase Order with following image mentioned path. (Order -> Prepayment)


3. Receive Goods and Final Invoice
When the chairs arrive, you post the final purchase invoice.
Business Central automatically adjusts the prepayment, so you do not pay twice.
Following image shows result when you check Order Statistics page. i.e, 1000 – 200 = 800

As you aware from Purchase end to end process posting how to guide of Navision Planet you may post directly like mentioned following image.


4. Accounting is Done Automatically
Prepayments are tracked separately in the system.
This makes financial reporting accurate and transparent.
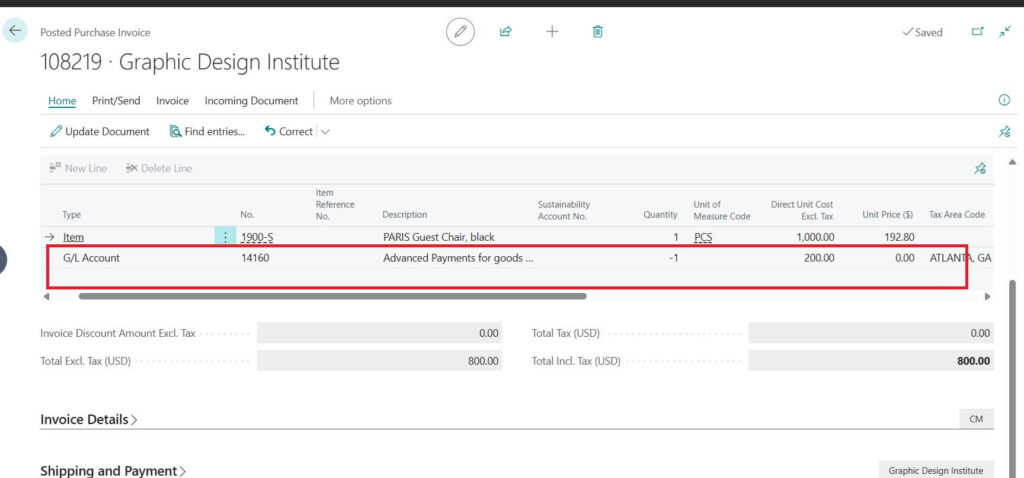
Following image shows final Posted Purchase Invoice where it shows automatically deducted the advance payment we made earlier.
Additional Real Life Example
Imagine your company orders laptops worth 5,000.
- Vendor asks for 20% prepayment (1,000).
- You record this in Business Central.
- Later, when laptops arrive, you post the final invoice of 5,000.
- Business Central subtracts the 1,000 already paid, so you only pay 4,000.
Simple, right?
Key Benefits of Using Vendor Prepayments in Business Central
Following are the Key benefits of Using the Vendor Pre-payment process in D365 Business Central (BC) ERP
- No manual tracking : the system handles it
- Accurate accounting : prepayments are posted to special accounts
- Prevents mistakes : avoids double payments
- Professional process : builds better vendor relationships
Vendor prepayments are common in business, and with Business Central, the process is smooth and error free. You just set the percentage, post the prepayment invoice, and let the system handle the rest.
If you are new to Business Central, try this feature on a small purchase order to see how it works in practice.
FAQ : Business Central Vendor Prepayment
A vendor prepayment is the advance money you pay to a supplier before receiving goods or services. Business Central helps you record, track, and adjust this easily.
It helps avoid manual mistakes, keeps accounts accurate, improves supplier trust, and gives you a clear view of pending payments.
When you post the final invoice, Business Central automatically deducts the prepayment amount, showing you only the balance left to pay.
Yes, since advance payments are tracked, you get a clearer picture of your cash outflows and commitments.


 + Free Mock Exam")