Every cashier who works on an LS Central POS screen depends on a small set of POS commands to run the till fast and without errors. LS Central controls the whole POS behaviour through commands that are attached to buttons in the Interface Profile. When you tap a button, it fires a command. When you know the right command, sales move quicker, queues get shorter, and mistakes drop.
This post gives you a verified LS Central POS commands list focused on real day to day retail use, from starting a sale to closing the shift. Every command code below is checked against the official LS Retail help. There are over 400 POS commands in LS Central, so this guide keeps to the ones cashiers, store managers, and LS Central consultants actually use the most.
Note: In LS Central, POS commands are inserted when you insert default data and POS modules. The command code is what does the work, and the button caption is only what the cashier sees. So the same command can sit on differently labelled buttons in different stores. Many commands also use a Post Command, a second command that runs right after the first.
Table of Contents
What Are LS Central POS Commands?
A POS command is an instruction that tells the LS Central POS what to do when a cashier presses a button. Each command has a command code, an optional parameter, and a description. LS Central divides them into internal commands (used by the system) and external commands (placed on buttons). You can also build custom external commands in AL for special store needs.
The commands below are grouped by how a cashier actually uses them during a normal working day, so you can find the right one fast.
1. Sales and Item Entry Commands
These are the commands a cashier touches most often, on almost every transaction.
- ITEMNO – Starts an item sale and takes the item number as input. This is the base of most sales.
- ITEM – An internal command that prompts for an item number.
- PLU_K – The Price Look Up key. It initiates a sale for a set item, commonly used on quick keys and department buttons.
- ITEMFINDER – Opens the Item Finder so a cashier can search for an item when the barcode will not scan.
- ITEMPIC – Shows a picture of an item and then starts the sale, useful for produce and bakery.
- NEG_QTY – The Negative Quantity command. It turns the next scanned item into a negative line, used for returns inside a sale where allowed.
- NEWSALE – Creates a new sale.
Tip: Train new cashiers on ITEMFINDER first. It cuts down counter delays more than almost any other command, because staff stop calling a supervisor for every unlabelled item.
2. Price Check and Quantity Commands
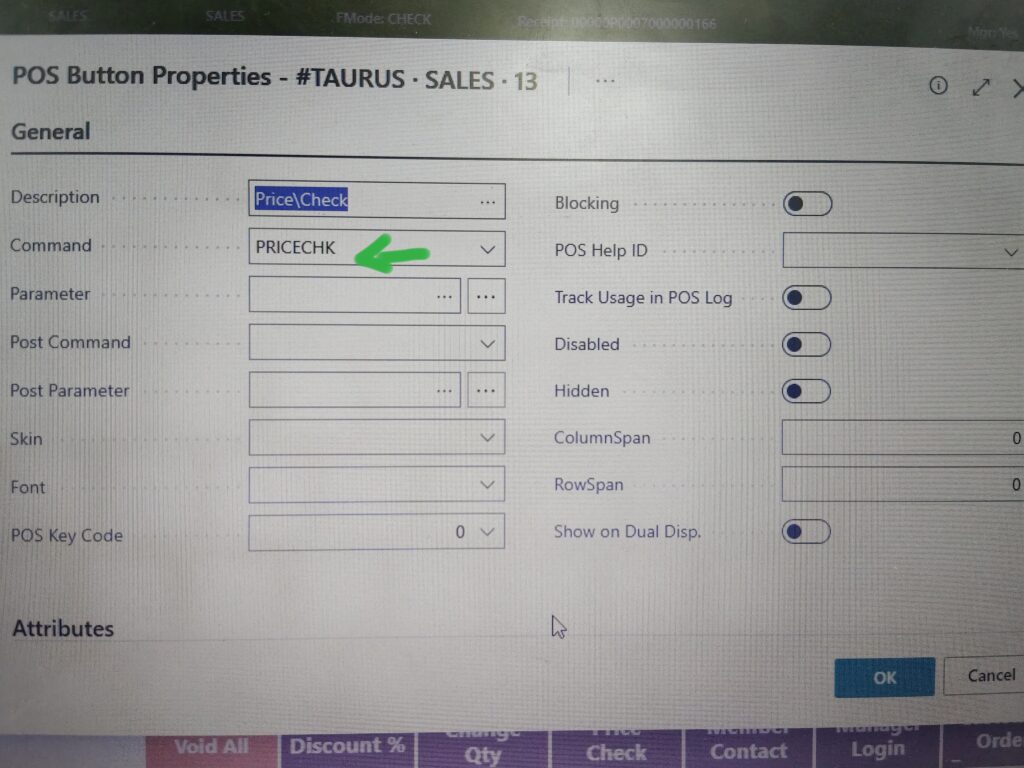
- PRICHECK – The Price Check command. It checks the price of an item without adding it to the sale, which is the command customers ask for most at the counter.
- INV_LOOKUP – Used with the Transaction Server to show the stock quantity of an item from a lookup menu.
- LINE_UP and LINE_DN – Move the cursor one line up or down in the receipt.
- LINE_SELECT – Marks the active line, for example before applying a discount or a void.

3. Payment and Tender Commands
Payment commands finalise the sale. Getting these right protects your cash balance and your end of day figures.
- PAYMENT – Puts the POS into the payment state, moving the transaction from item entry to tender.
- TENDER_K – The Tender Key. It takes a tender type as its parameter, for example cash, card, or voucher. This is the core payment command, one button per tender type.
- AMOUNT_K – The Amount Key. It sets a fixed paid amount and usually runs TENDER_K as its Post Command, for example a quick 50 cash button.
- CURR_K – The Currency Key. It takes payment in a foreign currency or shows the total in that currency.
- EFT_DEVICE – Sets the active card terminal, then usually runs TENDER_K as a Post Command to send the payment to that device.
- PAYM_ACC – Takes a payment into a customer account.
Important: Cash and card buttons are almost always TENDER_K with a different tender type number as the parameter, not separate commands. If a tender button behaves wrongly, check its parameter first.
4. Return, Void and Cancel Commands
Returns and voids move money out of the till, so most stores restrict them with manager login.
- NEG_QTY – Turns a scanned item into a return line inside a transaction.
- VOID – Voids the selected line from the current sale.
- CANCEL – Cancels the last input or action, or steps up one level.
- CANCEL2 – A hard cancel, the same as pressing CANCEL twice, often used to drop the whole transaction.
- COPY_TR – Copies a posted transaction from the Transaction List back into the journal, used as a base for a return against an old receipt.
Warning: LS Central does not ship a single generic REFUND button. Refunds are built from a return sales type plus NEG_QTY, or by recalling the original transaction. Always return against the original receipt where possible so the refund keeps the real sale price.
5. Discount and Price Override Commands
These commands adjust price, so they are usually locked behind manager approval.
- DISCAM – The Discount Amount command. It gives a fixed discount amount on the selected sales line.
- DISCPR – The Discount Percentage command. It gives a discount percent on the selected line, either a fixed value or a typed one.
- DISCPAYM – The cashier types the final amount to pay for a line and the system works out the discount.
- DISRESET – Resets the line discount back to zero.
- COUPON – The Coupon key, to apply a coupon to the sale.
6. Customer and Loyalty Commands
- CUSTOMER – Internal command that prompts for a customer number.
- CUSTCREATE – Creates a new customer at the POS.
- CUSTHISTORY – Views the customer sales history.
- MEMBERCARD – Enters a loyalty member card number.
- MEMBERCARDREAD – Reads a member card from the reader.
- COUPON_LIST – Shows the member coupon list.
7. Cash Management Commands
Cash management commands control physical money in the drawer and feed directly into your reconciliation.
- OPEN_DR – The Open Drawer command. It opens the cash drawer without a sale.
- FLOAT_ENT – The Float Entry command. It records the opening float placed in the till, closed with a POST command.
- INCEXP – The Income/Expense command. It records money paid in or out of the drawer against an income or expense account.
- PHYS_INV – Starts a physical inventory count from the POS.
- NEG_ADJ – Starts a negative stock adjustment from the POS.
8. Login, Shift and End of Day Commands
These control who is on the till and hand over correct figures at close.
- LOGIN – Logs a staff member into a sale.
- LOGOFF – Logs the user off and returns to the login screen.
- LOGON – Starts a specific sales type sale.
- MGRKEY – The Manager Login Key. It lets a manager authorise an action without the cashier logging out.
- CH_STAFF – Changes the staff registered on the sales header.
- OPERATOR – Changes the operator.
Caution: The X report and Z report at the POS are handled through statement and tender declaration routines, and the EFT terminal has its own EFT_GET_XREPORT and EFT_GET_ZREPORT commands for the card device. Do not confuse the store statement close with the card terminal close, they are separate.
9. Receipt and Reprint Commands
- EMAIL_C – Emails a copy of a receipt selected from the transaction list.
- EMAIL_LAST_C – Emails a copy of the last receipt.
- EMAIL_IC – Emails a copy of an invoice from the transaction list.
- GIFT_PRINT_LAST – Prints a gift receipt for the last transaction.
Quick Reference: Most Used LS Central POS Commands
| Command | What It Does | Typical User |
|---|---|---|
| ITEMNO | Start an item sale by item number | Cashier |
| PLU_K | Quick key for a set item | Cashier |
| PRICHECK | Check a price without selling | Cashier |
| PAYMENT | Go to the payment state | Cashier |
| TENDER_K | Take a tender (cash, card, voucher) | Cashier |
| NEG_QTY | Return an item inside a sale | Supervisor |
| VOID | Void the selected line | Supervisor |
| DISCPR | Percent discount on a line | Manager |
| OPEN_DR | Open the cash drawer | Cashier |
| FLOAT_ENT | Enter the opening float | Cashier |
| MGRKEY | Manager authorisation | Manager |
How to Add or Change a POS Command in LS Central
To edit which command sits on a button, follow these steps:
- Open the POS Commands list to view the available commands and their codes.
- Open the Interface Profile assigned to your POS.
- Select the Menu or panel that holds the button you want to change.
- Set the button’s Command, its Parameter, and any Post Command, then update the button caption.
- Run a data distribution or replication so the store POS picks up the change.
Caution: Never delete a standard command from a live interface profile without testing on a copy first. A missing TENDER_K or PAYMENT button can stop the till from taking money.
Frequently Asked Questions
What is the most used command on an LS Central POS?
Item entry commands such as ITEMNO and PLU_K are used on nearly every transaction, followed by PAYMENT and TENDER_K to take money.
Which command takes a card payment?
Card payment uses TENDER_K with the card tender type as the parameter. On systems with multiple terminals, EFT_DEVICE selects the terminal first and runs TENDER_K as its Post Command.
How are returns done in LS Central?
There is no single refund command. Returns use a return sales type with NEG_QTY, or you recall the original transaction with COPY_TR and refund from it. These are usually restricted with MGRKEY.
Can I create custom POS commands?
Yes. You register a codeunit as a POS module and add external commands in AL, then link them to buttons through the interface profile like any standard command.
Conclusion
Knowing this LS Central POS commands list turns a slow cashier into a fast one. Master the item entry and tender commands first, then layer in returns, discounts, cash management, and end of day commands as staff grow more confident.
You can confirm every command code in the official LS Central POS Commands reference.