
Table of Contents
Microsoft Dynamics 365 – Business Central Installation using Docker FREE
Now we can install the Dynamics Business Central / Dynamics NAV versions FREE for Demo and test interface. Yes you heard is right its absolutely Free. In this post I will explain this exciting feature to you. Before starting this post hope you have aware of Docker software, if not then request you to visit our Docker and Containers for Microsoft Dynamics
How to Install D 365 – Business Central on Local Machine for Free ?
First up all need to understand that from Business Central on-wards Microsoft not providing downloadable setups directly from partner source like earlier routine followed by Microsoft ERP. Docker is one of the way to setup the Business Central on Local computer. Advantage over normal installation is that it will allow to install and execute multiple CUs parallel in few minutes. Following are the steps to Setup the Business Central.
- Step 1: Install and Activate Docker Software ( If already exist Docker then skip this step )
- Step 2 : Pull Dynamics Business Central Image
- Step 3 : Run Dynamics Business Central Image
- Step 4 : Opening First Dynamics 365 Business Central Application
Step 1: Install and Activate Docker Software ( If already exist Docker then skip this step )
First step to prepare the interface for Business Central is to install the Docker software. Before start installing docker please understand like other software’s Docker too required some basic setups need to enable on system. Those details are as follows
Pre-requisites for Docker Installation
- Make sure on BIOS setup activated the Virtual machine feature.
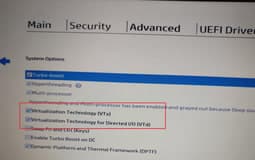
- Activate Container and Microsoft-Hyper-V options on “Turn Windows Features On or Off“

- Windows 10 or higher for Laptops and Desktops and Windows 2016 Server or higher for server machines.
Lets start the Docker Installation steps
You can directly download the docker software from Docker or by the help of following scripts
Docker Direct Download Steps
- Download Docker.
- Double-click InstallDocker.msi to run the installer.
- Follow the Install Wizard: accept the license, authorize the installer, and proceed with the install.
- Click Finish to launch Docker.
- Docker starts automatically.
- Docker loads a “Welcome” window giving you tips and access to the Docker documentation.
For more information visit Docker website for Windows 10 docker software
OR
Install Docker using script
Except BIOS setup we can activate the required setup using following script. All you have to do it run this command in Administrator via ISE or Command Prompt
Enable-WindowsOptionalFeature -Online -FeatureName Microsoft-Hyper-V, Containers -All
Set-ExecutionPolicy Bypass -Scope Process -Force; iex ((New-Object System.Net.WebClient).DownloadString('https://chocolatey.org/install.ps1'))
choco feature enable -n allowGlobalConfirmation
choco install visualstudiocode
choco install docker-for-windows
Restart-Computer -Force
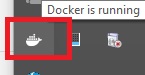
Once the Docker is installed it will show like following icon.
Step 2 : Pull Dynamics Business Central Image
This is the first step after Docker installation and activated. By the help of this step we will download the Image for the Dynamics 365 Business Central Image. For downloading the Docker image you have to copy the following script code and placed on ISE or Command Prompt with Administrator.
docker pull microsoft/bcsandbox:us
Where “docker pull” is the pull command and Image Name to be downloaded is “microsoft/bcsandbox:us“. Keyword “us” stands for country. If you remove this system will download w1 version default. Similarly if you have mention “uk” instead of “us” then considered as United Kingdom Business Central Image.
Once the “Pull” command executed it will take sometime to complete the same.
For the Business Central installation it will take download file size as 12 GB approx and after extraction around 16 GB as on August 2018.
Approx time for this activity first time where none of the Dynamics NAV Images available machine is around 3hrs to 6 hrs depend upon network speed. Total file downloading size is 12 GB+
Step 3 : Run Dynamics Business Central Image
You can run and execute the Dynamics Central image as container just have process the command
docker run -e accept_eula=Y -m 3G microsoft/bcsandbox:us
Once it will run then will show the Business Central login credential details like follows
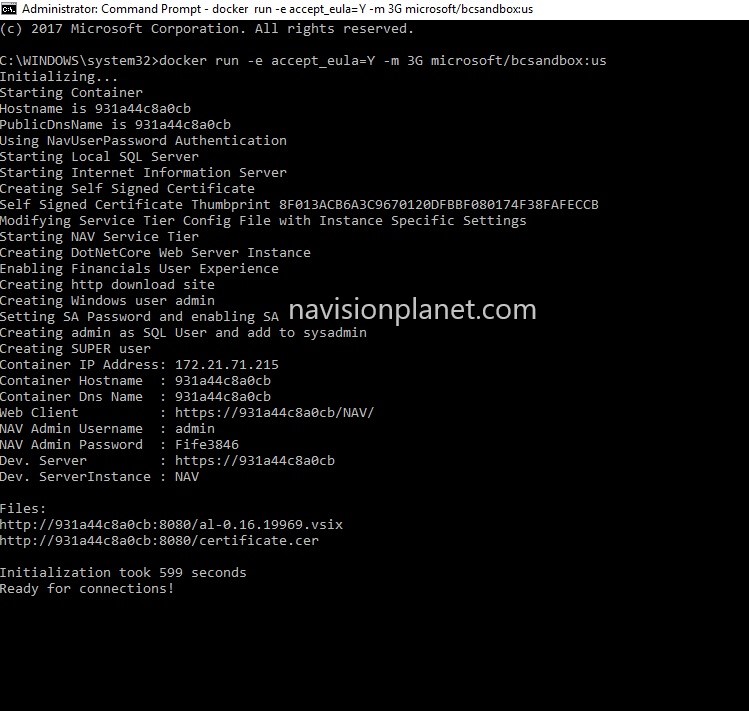
Approx time for this activity is 2 to 10 minutes
Step 4 : Opening First Dynamics 365 Business Central Application
For opening Business Central using browser. Open any web browser like chrome and enter the URL mentioned on the Web Client mentioned on the above screen. After entering the same system will ask for User ID and Password. Default User ID for Log in is “admin” and Password you have to check on your command result. Sample screen after log in to Business Central is as follows

In the upcoming post will explain how to use further. Enjoy using new Business Central application demo for Free!!. If you are having further doubts feel free to raise a comment on this page.

